I am no expert on raising meal worms, but I've gotten enough personal emails asking about it that I thought I'd post about the method I have chosen - and include pictures.
NOTE: I suppose I should post a warning right about now, so here it goes ..... If you are not interested in learning about raising meal worms OR you are squeamish about looking at pictures of worms or bugs, this is NOT the post for you! Slowly back away from your computer monitor, close this page, and no one will get hurt.
I decided to raise meal worms to feed to my chickens for two reasons:
1) Chickens love meal worms and when I feed my chickens meal worms, they love me - or at least they pretend to love me, and that's good enough for me.
2) Meal worms are a nutritious snack for chickens and when they eat nice, nutritious snacks, it cuts back a little on the amount of feed I must provide.
Chickens are also a hoot to watch as they scramble, scream, and fight over meal worms, but that's kind of covered in #1 above.
A simple search of the internet will reveal countless pages on the subject of raising meal worms, and I've looked at most of them. In the end, I chose a method that I felt would be least expensive and cause the least amount of work.
If you are fortunate, you will find someone locally that sells meal worms (such as a bait shop or a shop that sells live critters to feed snakes, birds, etc.), or perhaps you may be able to sprinkle some corn meal on wet concrete and the meal worm beetles will come to you. If you're like me, you'll need to order them. You can do an internet search and find a dealer fairly easily, with one small note of importance - at the time of this posting, there appears to be a world wide shortage of meal worms. I am not making this up. I have noticed a few dealers seem to be getting more meal worms in their inventory, so maybe things are looking up for the meal worm industry.
I bought my meal worms from the Worm Guy. Yes, there really is a guy that sells worms - lots and lots of just about every kind of worm a person could desire. I have no affiliation with the Worm Guy, other than visiting his website and making a purchase from him, but I will provide this link to his website for those of you who are interested. I also recommend reading his page on breeding meal worms. Lots of good info there.
So now that you've got a line on getting your meal worms, let me tell you how I got set up for mine.
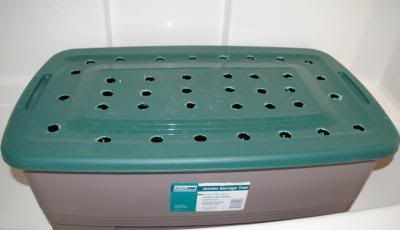
I had an old, very large, plastic bin with a lid laying around that I decided to use. I don't know what you call these things. The label on the side says it's a tote, but I've never called those plastic bins a tote. At any rate, I took this plastic bin/tote and cleaned it up with some warm, soapy water. Then I drilled holes in the lid of it so that I could place the lid on it and keep the cats out without suffocating all those little worms. I used a 1 inch fly bit to drill the holes. The whole thing looks like this:
It's sitting in the tub of our spare bathroom, so you can't see the bottom of it in that picture, but you get the idea.
Then I filled the bottom of the plastic bin with about six inches of chicken feed. The chicken feed is the medium that is used for bedding, and for food. I ordered 1000 meal worms and at the rate they reproduce, I figured I'd need a fairly large container and a fair amount of bedding.
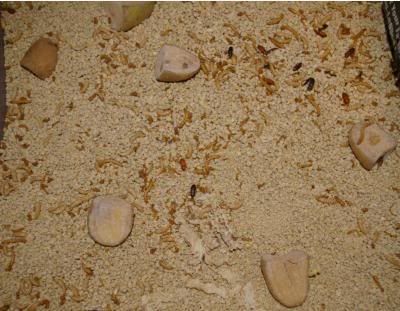
Next, I put a couple of potatoes (quartered) and a few wedges of cabbage on TOP of the feed. These will be the source of water for the worms and beetles:
You may notice there are already worms and beetles in the above picture, and that the potatoes look a little old. I didn't take a picture before I added the worms, so it's the best I can do right now. Just pretend there aren't any worms or beetles in that picture and that the potatoes are fresh. And, by the way, you don't need to use both potato and cabbage. One or the other will suffice. I just happened to have both in the kitchen when it came time to throwing a water source in the bin. It may be worth mentioning, though, that my meal worms seem to prefer the cabbage.
Then, I dumped 1000 meal worms on the top of it all, covered them with newspaper, placed the lid on, set the whole rig in the DRY tub, turned off the light, and went about checking my email and surfing the internet:
Meal worms do best when the temperature is between 75 and 80 degrees. They also do not like light. So keep them in a place where the temperature agrees with them and keep newspaper layered on top of them, and they should be happy. The newspaper also works well for collecting the worms to feed to your chickens. The worms like to crawl up between the newspaper layers, so you can just carefully pick up the newspaper and funnel it into a container when you're ready to feed the chickens.
That really is all there is to it. You'll need to check the potato or cabbage every week or so and make sure it hasn't dried out too much, or gotten moldy. And over time you may need to add a little more chicken feed, but other than that, you are now raising meal worms!
One of the most common questions I've received is "How do you keep the beetles that emerge from flying out of the bin?". Well, it's really very simple. You just clip their little wings. OK - I'm just kidding. The truth is, the beetles don't fly. And they can't climb up the slick sides of the plastic bin, so your little beetles will be stay-at-home beetles and focus only on the job of procreation.
If you are still with me at this point, you may be interested in looking at the following pictures of the life cycle of the meal worm. The first step in the life cycle is the egg, of course, but I don't have any pictures of the eggs yet because I haven't taken the time to dig around and find them, but other than that minor detail, I do have the following to offer:
When you first get your meal worms, they will most likely be in the larvae stage and look like little...well....worms. These are the meal worms. They crawl around at this stage and stay busy doing worm things like wiggling and sucking moisture from a potato. They also shed their skin and you'll start noticing the shed skin laying around in the bin.
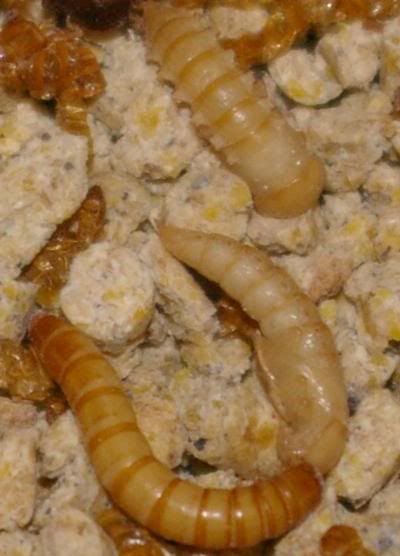
After a short while, you'll start seeing little white/tan looking blobs laying around. Congratulations! You now have pupae. Pupae don't do much and aren't very much fun, but they are interesting to look at and watch as they change. Here's a picture of a meal worm laying next to a pupae:
The meal worm is the darker worm in the bottom of the picture, and the pupae is the white/tan blog just above the meal worm. This particular pupae is a little older, as you can tell by noticing the wings are already beginning to develop.
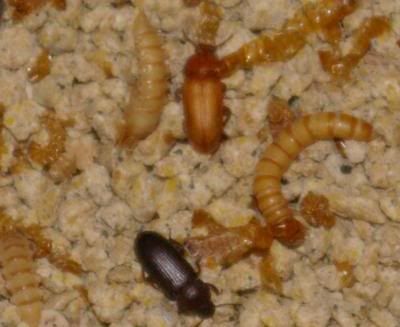
The little white pupae will continue to mutate and one day you'll look in your bin and notice little beetles crawling around. When they first emerge, they are solid white. Very shortly, they begin turning a light brown. Eventually, your beetles will be black.
This picture has a younger beetle (light brown), an older beetle (black) a meal worm (brown worm), a pupae (white/tan blob), and a bunch of shed skin:
So, to recap, it starts with an egg, goes to a meal worm, turns into a pupae, and ends up a beetle.
As I understand it, a single female beetle can lay up to 500 eggs in her very short life. That's a LOT of eggs! So if you start with 1000 meal worms and let them go through their life cycle, be prepared to feed your chickens lots of delicious meal worms on a regular basis.
As I said, I'm no expert on raising meal worms, but it really doesn't take one to do this successfully. Get a bin, throw in some chicken feed, add a few potatoes, and toss in some worms. Keep them in a place between 75 - 80 degrees, make sure they have moist potatoes and/or cabbage at all times, scoop out a few meal worms daily to feed to your chickens, and then stand back and bask in the love your chickens will bestow upon you - or pretend to bestow upon you.
Bee Free,
Penny
Saturday, August 30, 2008
Raising Meal Worms 101
Posted by
basicliving@backtobasicliving.com
at
3:29 PM
![]()
Labels: basic living, chickens, homestead, homesteading, raising meal worms
Subscribe to:
Post Comments (Atom)
2 comments:
This has got to be the best meal worm article ever! I got home from a 3-day trip with what I thought were dead meal worms for my lizard T-Rex. The worms had started their transformation. I have to admit I now have a very happy lizard and 12 happy chickens. I didn't realize the chickens would eat the worms too. I just didn't think of it. Thanks so much. The pictures was the saving grace.
If all your worms were about the same age when you got them, you will notice over time that you have a BUNCH of beetles, and not many worms. Just be patient. Before you know it you will be over run with juicy worms T-Rex and your chickens will just love. Thanks for the kind note - I'm really happy you got use out of the post.
Bon Appetit!
Penny
Post a Comment